
By Mark Hampson | J26 Productions
Production / Logic Pro for Mac / Guide 04
A promising loop deserves somewhere to go. This practical Logic Pro workflow takes a small collection of sounds through rhythm, melody, arrangement and mixing, ending with a demo you can judge away from the screen.
J26 illustration for the Logic Pro guide, not a software screenshot.
Give the idea a destination
There is a point in a production session when the loop sounds brilliant, the project looks busy and absolutely nothing has happened beyond bar eight.
Another synth might make it bigger. Another hour browsing sounds might make it different. Neither necessarily makes it a song.
For the fourth guide in our From Empty Project to Demo Mix series, we are taking that familiar problem into Logic Pro for Mac. The route is deliberately modest: a short electronic demo with a beginning, a change of direction and an ending. Not a finished master. Something another person can play without needing you beside them to explain what it will eventually become.
My home base remains Cubase, which I have used since 1990. This series is about applying useful production decisions to different working environments, not pretending that every DAW should behave like my own.
The J26 rule: choose a small palette, give every section a purpose and finish a version before expanding the idea.
This is a documentation-based guided exercise, checked against Apple's Logic Pro for Mac User Guide, not a hands-on product review or a downloadable demonstration project. Screenshots kindly supplied by Andy Rendell (AMC) show examples from his own Logic sessions, not a completed run of this exercise. Tempos, track counts and plug-ins may differ from the suggested setup. Instructions refer to the Mac application, the iPad workflow is different.
1. Set a finish line before choosing a sound
Aim for 40 bars in 4/4 at 124 BPM, roughly 77 seconds before the final effects tail. Use drums, bass, one chord or atmospheric part and one recognisable hook. That is enough material to discover whether the idea works.
Start with an empty project, set the tempo and time signature, then save it as something useful, such as J26_Logic_Demo_124BPM_v01. Choose a musical key for the exercise and keep it in your project notes.
When saving, pay attention to the asset options. A project can be organised as a package or folder, but the selected options determine which assets are copied into it rather than referenced elsewhere. Do not assume a project file automatically contains every sample it uses. Apple: saving projects.
Name the first tracks by their jobs: Drums, Bass, Chords and Hook. Resist adding ten empty tracks for instruments you might need later.
What step 1 must prove: the project has a purpose, a tempo and a sensible place to live.
2. Choose a small palette and learn the workspace
Load an included drum kit and three software-instrument sounds. Choose a bass that holds its shape, a chord sound that leaves room for the hook, and a lead that is interesting without needing six layers.
You can change these later. For now, audition a handful and commit. This exercise needs musical decisions more than it needs a perfect preset.
The Tracks area is our main workspace. Regions sit on track lanes against the timeline, making it possible to see where ideas enter, repeat and disappear. Editors let you work on the material inside those regions. Apple: the Tracks area.
Logic also offers Live Loops, but this guide takes a linear route through the Tracks area. One clear approach is easier to learn than switching between every available option.
No extra plug-in purchase is required. Use the sounds available in your installation and download any necessary included content before settling into the session.
What step 2 must prove: four sounds have clear jobs, and you know where their musical parts will go.
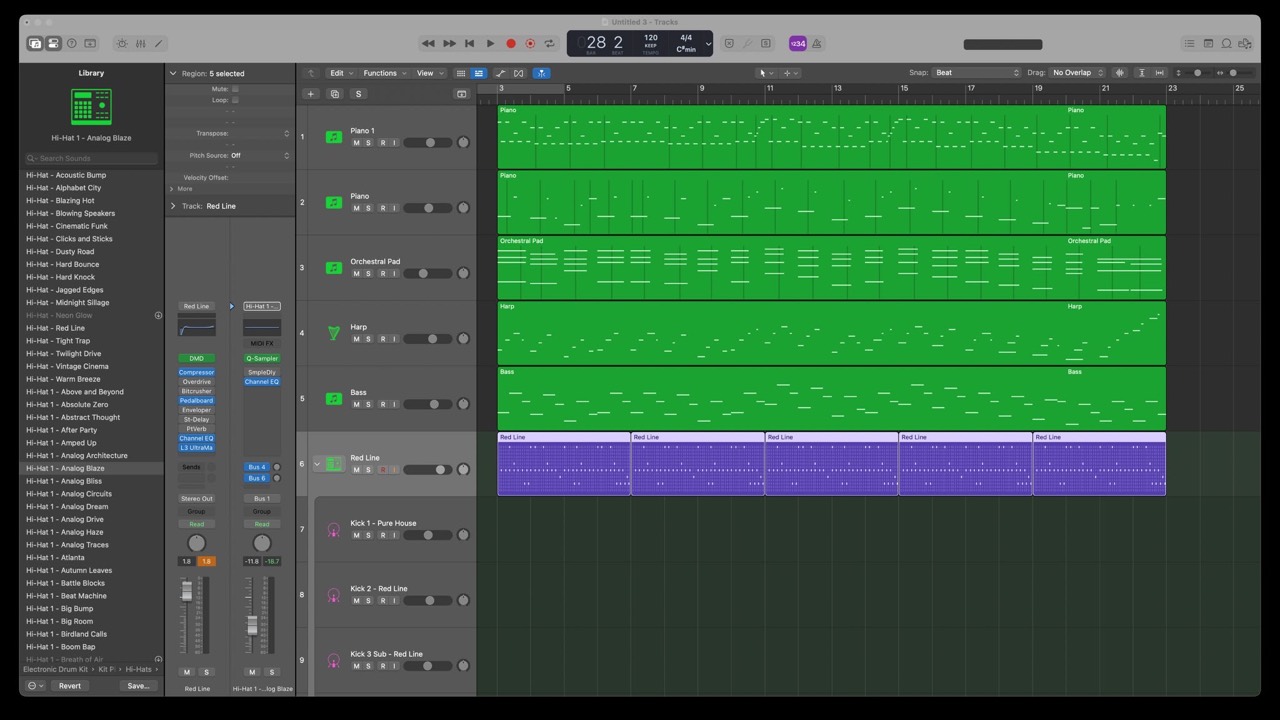
Piano, pad, harp and bass parts above a purple drum pattern region in Andy’s Logic session. This illustrates the Tracks area, not the four-track exercise. Screenshot: Andy Rendell (AMC). Open the image for a closer look.
3. Build a drum pattern with somewhere to breathe
On a software-instrument track with a suitable drum kit, Control-click an empty part of the Tracks area and choose Create Pattern Region. Open it in Step Sequencer. Its rows represent sounds or notes, the lit steps determine where they play. Apple: building grooves with Step Sequencer.
For a simple starting point, choose a 16-step pattern at a sixteenth-note rate. In 4/4, that gives one bar. Try a kick on steps 1, 5, 9 and 13, a clap on 5 and 13, and an offbeat hat on 3, 7, 11 and 15.
That is scaffolding, not a compulsory house-music formula. Adjust the sounds and emphasis until the groove points in the direction you want.
Use a few velocity differences to stop the hats feeling mechanically identical. Then extend the pattern region across the eight-bar working section. The pattern repeats within that region, its step count and the region's timeline length are different things.
Before adding percussion, remove one element and listen. If the groove becomes clearer, that is useful information, not a setback.
What step 3 must prove: the rhythm works without a wall of sounds hiding its weak spots.
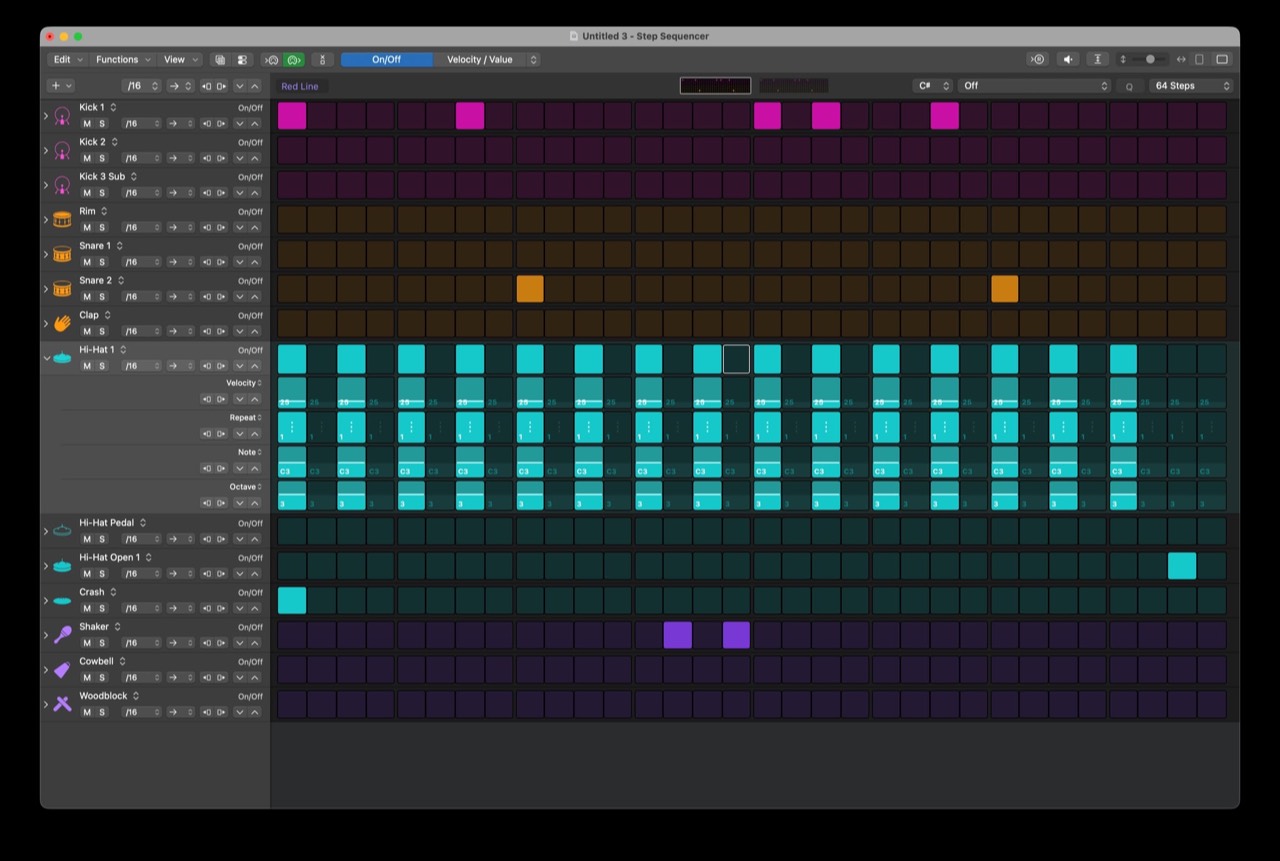
Andy’s Step Sequencer with a 64-step pattern selected and the hi-hat subrows expanded. This is his example, not the suggested 16-step starting pattern above. Screenshot: Andy Rendell (AMC). Open the image for a closer look.
4. Write a bass part and a hook worth repeating
Record a short MIDI phrase on the bass track, or create a MIDI region and enter notes in the Piano Roll. With the Pencil tool you can place a note and drag to set its length. A controller is useful, but not essential. Apple: adding Piano Roll notes.
Begin with fewer notes than you think you need. Let their lengths and rests work around the kick. A bass line that constantly fills the space may feel impressive alone and tiring against the drums.
Now add a chord or atmospheric layer and one hook. Give the hook a short phrase and an answer rather than an uninterrupted stream of notes. A three-note motif can carry more identity than an elaborate part with nowhere to pause.
Correct obvious timing mistakes, but listen before tightening everything to the same grid. The useful question is whether the parts move together, not whether they look perfectly aligned.
What step 4 must prove: there is an identifiable musical idea beyond the beat.
5. Arrange before polishing the loop
Turn off the short working cycle and build a beginning-to-end sketch. Use this map as an exercise, not a rule for every record:
Bars 1-8 - Introduction
Establish the groove with less bass or a reduced hook.
Bars 9-16 - Main idea
Bring the important parts together and reveal the hook.
Bars 17-24 - Contrast
Remove the kick or bass and give the harmony some room.
Bars 25-32 - Return
Restore the groove with one deliberate variation.
Bars 33-40 - Ending
Resolve the phrase and let the arrangement come down.
Logic's Arrangement track can label these sections. Add markers with its + button, then rename or resize them to suit. New arrangement markers are initially eight bars long. Apple: arrangement markers.
Fill the timeline by copying the material you need and removing what each section does not need. Do not let five section names disguise five identical repetitions.
Optional J26 companion: our paid Finish Your Track Workbook gives you a place to document arrangement, energy and mix decisions. It is a DAW-neutral J26 product, not an Apple manual, and is not needed to complete this guide.
What step 5 must prove: the music has a route from the opening to an intentional ending.
6. Make the return earn its place
The second main section should remind the listener why the first one worked, then offer something worthwhile in return for their attention.
Try a brief drum fill before bar 25, a higher answer to the hook, a shorter bass note at the end of a phrase or a single extra percussion sound. Choose one change, not all four.
Use a separate, editable region for a variation rather than assuming that a repeated or linked region can be changed independently. After editing, listen to both appearances and check that the original still plays as intended.
Give the transition a run-up. Listen from several bars before it, through the change and into the next phrase. A fill that sounds clever in isolation can interrupt the flow in context.
This is also a good time to remove any track that has stopped serving a purpose. Keeping an unused idea in a saved earlier version is cheaper than making the listener sit through it.
What step 6 must prove: repetition develops the idea without losing its identity.
7. Balance the song before reaching for more processing
Open the Mixer with View > Show Mixer or the default X shortcut. Its channel strips bring levels, panning, effects and routing into view. Apple: the Mixer.
Play the whole arrangement at a comfortable monitoring level. Start with faders and pan positions. Decide what the listener should notice first, then make enough room for it.
Listen to kick and bass together. If they obscure each other, consider the notes, register, sound choice and level before assuming compression will solve it. Add EQ or other processing when you can describe the problem it addresses.
Check that the intended channels reach your stereo output and that the mix is not clipping. A demo does not need to compete with a mastered reference for loudness. Turn the reference down when comparing it, so louder does not automatically sound better.
What step 7 must prove: the musical priorities remain clear without relying on volume or an impressive plug-in chain.
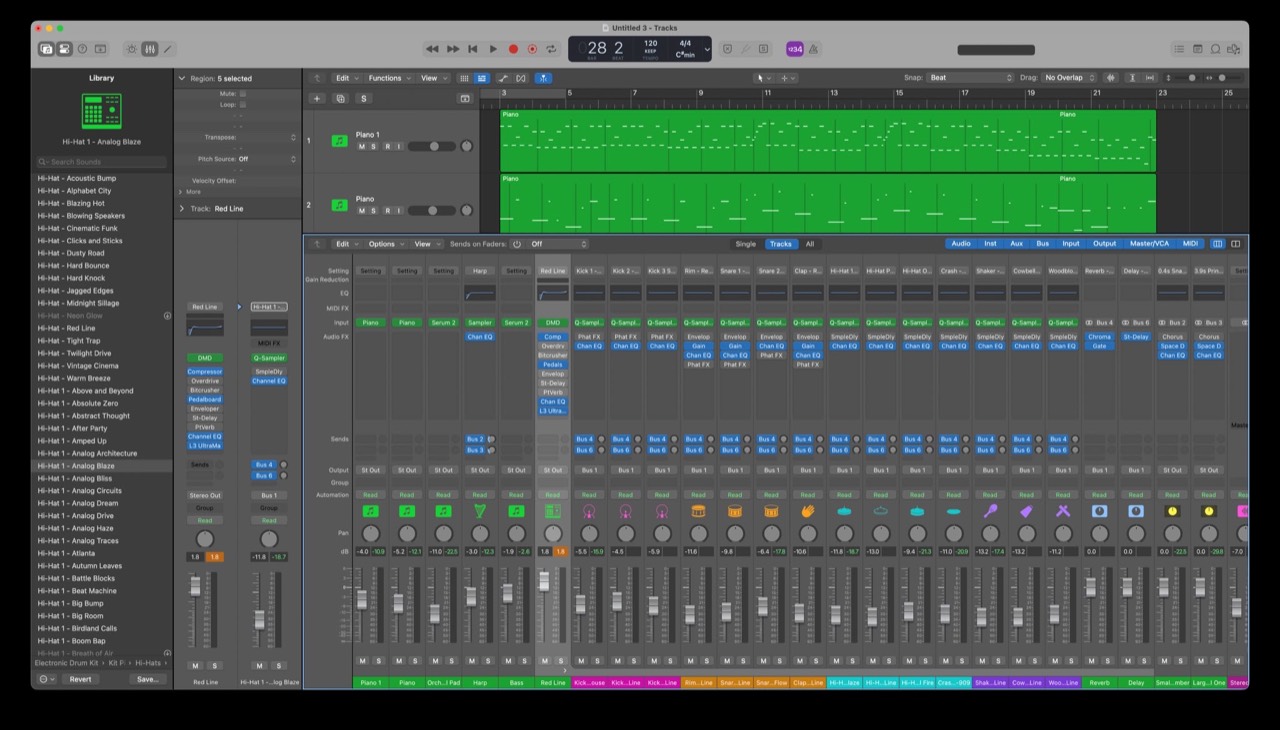
The Mixer in Andy’s session, showing instrument and drum channels, inserts and sends. His third-party plug-ins and settings are not required for this exercise. Screenshot: Andy Rendell (AMC). Open the image for a closer look.
8. Use automation to help the listener follow
Choose Mix > Show Automation, or use the default A shortcut. For this exercise, work with track automation, select a parameter such as Volume, then add and move points on its automation curve. Apple: showing automation and adding points.
Try gently lowering a supporting part when the hook arrives, or opening an instrument's filter through the transition into the return. Make the change serve the arrangement rather than demonstrate that automation exists.
Leave the track in Read mode to play back your finished automation. Touch, Latch and Write behave differently when controls move, so do not leave a track writing changes unintentionally. Apple: automation modes.
Listen across each entry and exit. The first point establishes a value as well as the later points creating movement, so check the beginning of the song too.
What step 8 must prove: changes in level or tone make the musical journey clearer.
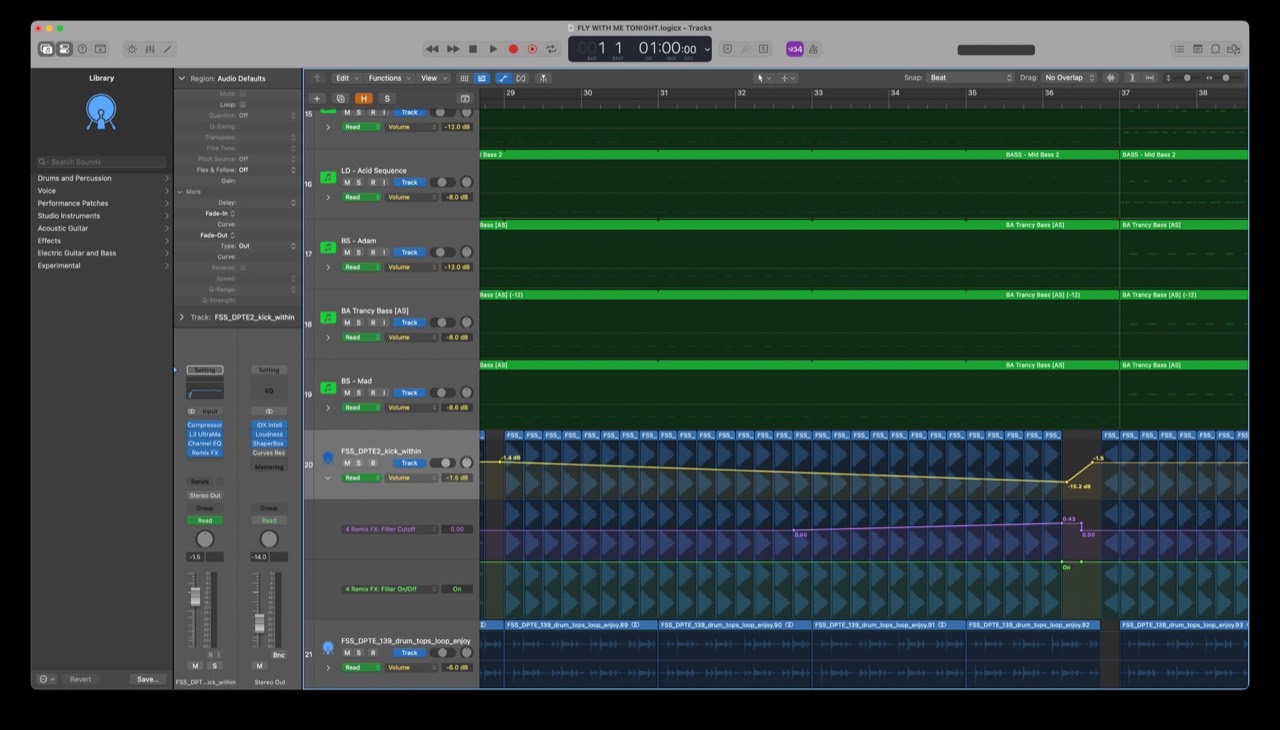
Volume and Remix FX automation lanes in Andy’s Fly With Me Tonight project. The curves illustrate changes over time, not prescribed values to copy. Screenshot: Andy Rendell (AMC). Open the image for a closer look.
9. Judge the music without fixing it mid-playback
Save a new version, return to the beginning and listen once without touching anything. Make notes instead.
Where does your attention drift? Does the contrast last too long? Is the return genuinely satisfying, or simply louder? Does the ending sound deliberate?
Choose three improvements with the biggest musical benefit. Make those changes and listen again. An unlimited list encourages an unlimited session.
If possible, check on a second familiar playback system at a sensible volume. Headphones can reveal detail that speakers disguise, while a phone can tell you whether the hook survives without deep bass. Neither replaces your main listening setup.
When you compare with a reference, compare a specific thing: the prominence of the vocal, the density of the chorus or the space around the kick. Chasing someone else's entire record usually obscures your own decisions.
What step 9 must prove: the arrangement communicates without the screen doing half the storytelling.
10. Bounce a file, then listen to that file
Choose File > Bounce > Project or Section. Check the Start and End positions, especially if Cycle is active: your eight-bar working loop must not become the entire export by accident.
For this demo, select an uncompressed stereo WAV at 24-bit and the project's sample rate. Leave Normalize off, check for clipping beforehand, and allow the final release and reverb to finish. Use Include Audio Tail where appropriate and listen to the result. Plug-ins that keep generating noise can produce an unexpectedly long tail. Apple: bouncing a project.
These are working-demo choices, not a universal delivery specification. Follow the recipient's requirements when supplying a release or mastering job.
Name the file TrackName_Demo_01.wav, then play it outside Logic from start to finish. Check the opening, transitions, stereo balance and final decay.
Finally, keep the matching project and its assets together. File > Project Management > Consolidate lets you copy selected external assets into the project. This does not install any third-party plug-ins on another computer. Apple: consolidating assets.
What step 10 must prove: another person can press play and hear a complete musical idea.
A finished version gives you something to improve
The point is not to use every instrument in Logic or fill every empty lane. It is to make a sequence of musical decisions and hear where they lead.
A demo can be imperfect and still be useful. It can show you that the hook deserves a longer arrangement, that the bass needs rewriting, or that the strongest moment is the one you nearly deleted.
What matters is that you now have a piece of music to respond to, rather than another project whose best section is permanently about to happen.
Quick answers
Do I need a MIDI keyboard?
No. You can enter notes in the Piano Roll and build rhythms in Step Sequencer. A keyboard changes how you perform ideas, it is not a requirement for this exercise.
Do I need extra sample packs or plug-ins?
No. Start with included sounds available in your installation. More tools are an option, not a missing step.
Is this for Logic Pro on iPad too?
The musical decisions transfer, but these menu paths and shortcuts are for Mac. Use Apple's separate iPad guide for its controls.
Is the result ready for release?
Not automatically. A demo export is a listening and feedback milestone. Final production, mastering, rights checks, artwork and delivery still need attention.
Useful next steps from J26
Start with the free Finish Your Next Track Checklist if the biggest challenge is deciding what to do next.
For a more structured companion, the paid Finish Your Track Workbook follows the creative decisions. Once a track is genuinely ready, the Independent Artist Release Toolkit focuses on planning its release. Both are also available in the Complete Creator Toolkit Bundle.
These are J26's own paid products, available through the J26 Shop. They are optional and are not required for the walkthrough. This article is independent and is not sponsored or endorsed by Apple.
Continue the series
- Compare six DAWs for electronic music.
- Cubase: From an Empty Project to a Demo Mix.
- Ableton Live: From Session View Idea to a Finished Demo.
- FL Studio: From First Pattern to Finished Demo.
Next planned guide: Pro Tools.
Further reading
- Apple's Logic Pro for Mac User Guide: the starting point for detailed help and the version selector.
- Step Sequencer: pattern creation, velocity and pattern length.
- The Piano Roll: placing and shaping MIDI notes.
- Arrangement markers: labelling your song's structure.
- Automation modes: understanding Read, Touch, Latch and Write.
- Bouncing your project: export range, formats and tails.
- Logic Pro product information: current availability, requirements and included features. This is an Apple link, not a J26 affiliate link.
What usually stops your idea becoming a finished demo: the arrangement, the mix, or deciding it is ready to export?