
By Mark Hampson — J26 Productions
Turn the loop into a song without losing the energy that made it exciting
Ableton Live is exceptionally good at helping an idea appear quickly.
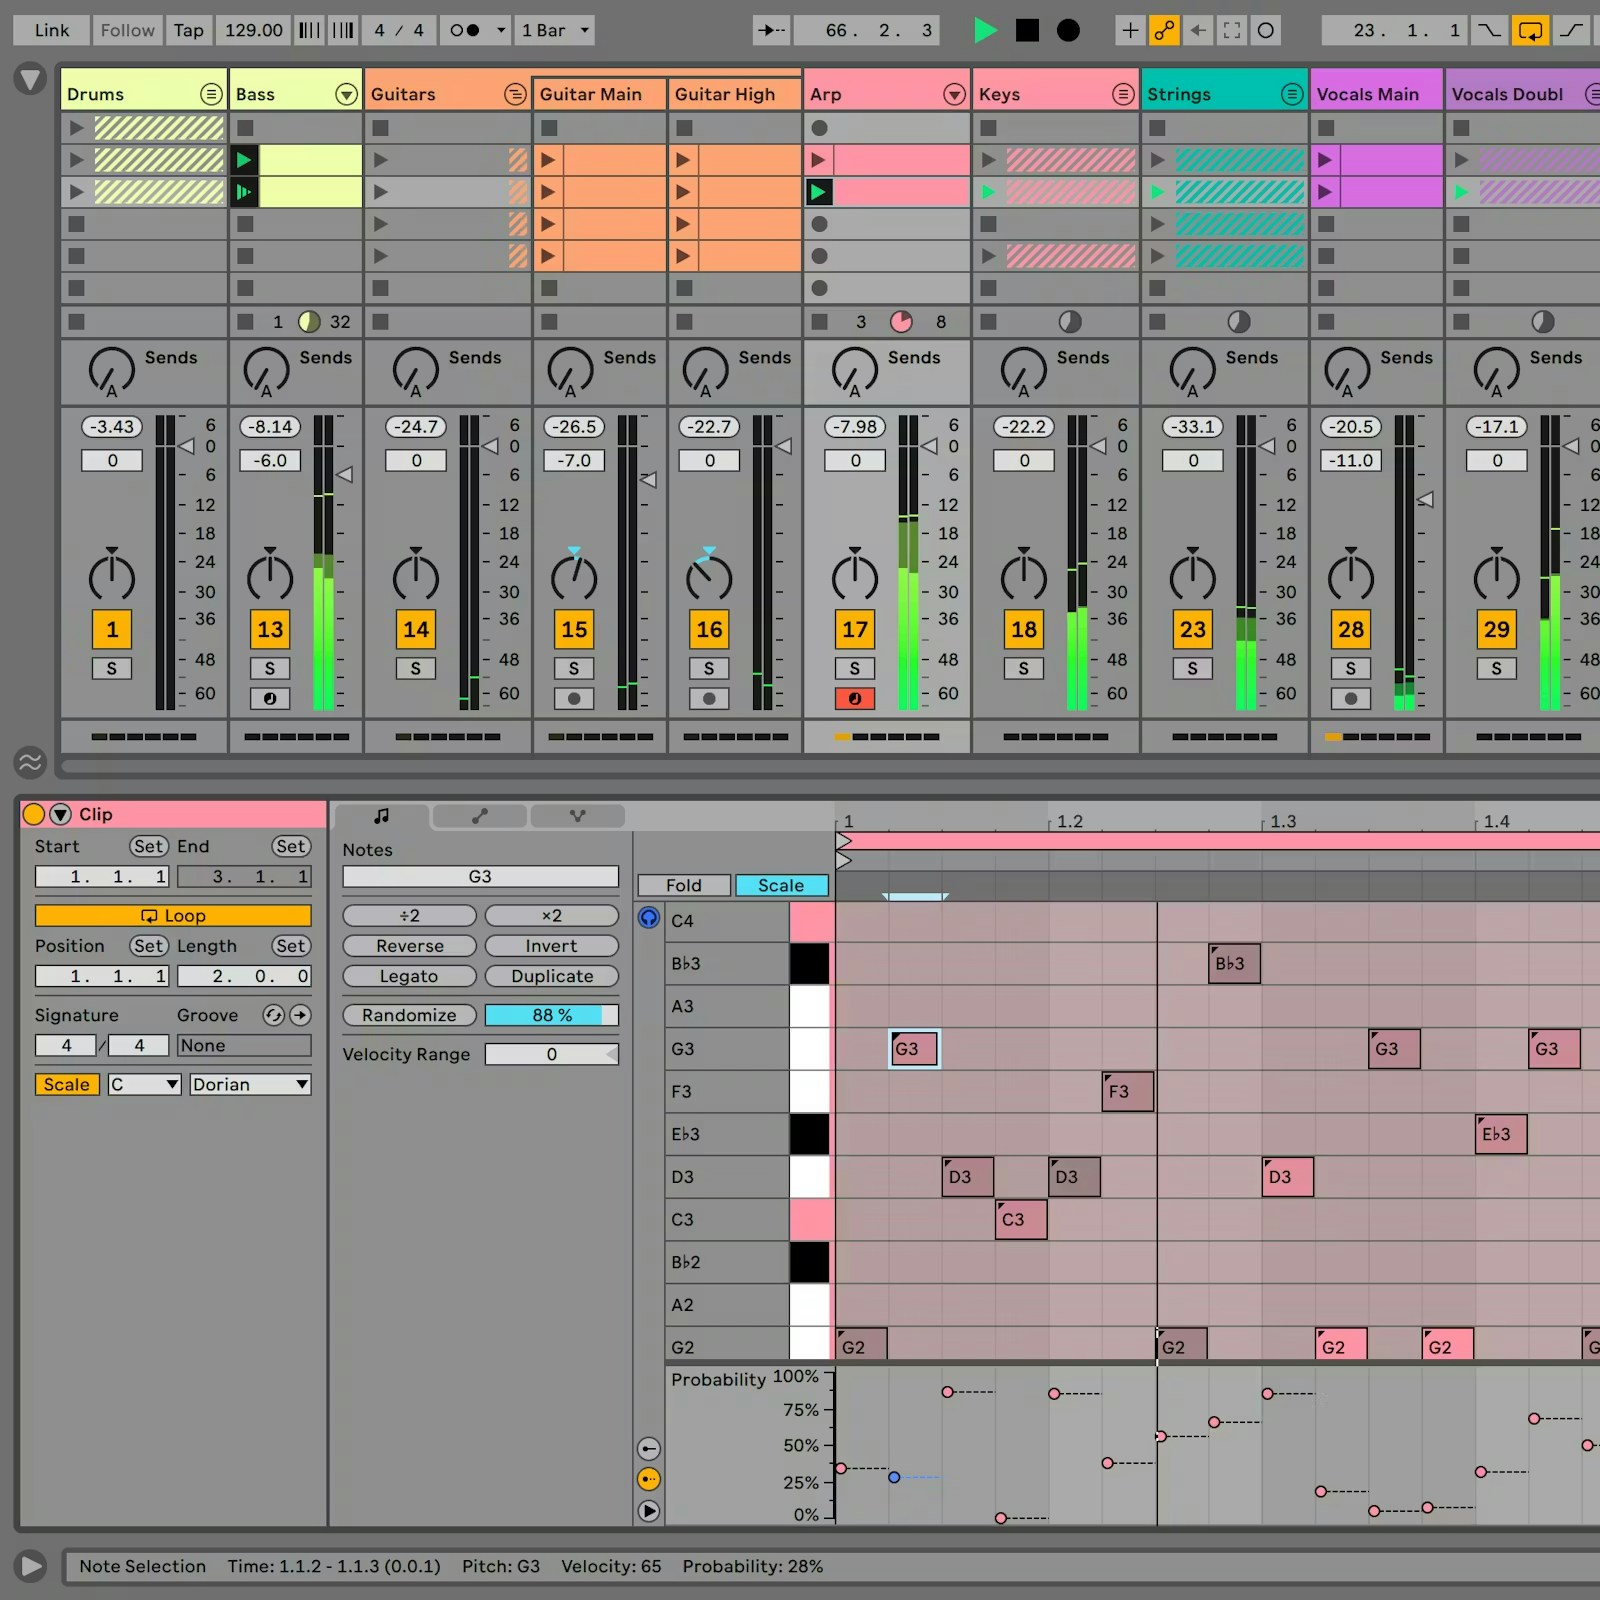
A drum clip begins looping. A bass part joins it. A chord or sample creates a mood, and within minutes the Session View contains something that feels exciting. The problem arrives when that excellent eight-bar moment has been playing for twenty minutes and still has no beginning, development or ending.
I know that feeling very well. A loop can sound increasingly finished simply because I have heard it enough times to memorise every detail. Then I export it, listen away from the screen and realise I have made a very polished circle.
Live was designed around a useful relationship between two different ways of making music. Session View lets clips and scenes behave like a flexible sketchpad or performance space. Arrangement View places the music on a linear timeline where its full journey can be shaped. The two views share the same tracks, which means the first idea does not need to be abandoned when the arrangement begins.
That relationship is the centre of this walkthrough.
This is not an attempt to make Ableton Live behave like Cubase with different buttons. It is a ten-step route that uses Live on its own terms, beginning with clips and scenes, performing the strongest ideas into the Arrangement, then editing, balancing and exporting a clear electronic demo.
The result does not need to be mastered or release-ready. It needs to prove that the musical idea can survive beyond the loop.
The J26 rule for this exercise: preserve the excitement of the first idea, but make every new section earn its place.
The demonstration brief
For this walkthrough, I will build a fresh 60 to 90-second electronic demo in Ableton Live 12 Standard using included devices and sounds wherever practical. The exact instruments can change according to the Live edition being used, but the working limits remain deliberately simple:
- one tempo and one musical key,
- one focused group of sounds,
- one drum foundation,
- one bass part,
- one chord, atmosphere or sample layer,
- one recognisable hook,
- three useful scene variations,
- one short Arrangement with a beginning, development and payoff,
- one balanced stereo demo export.
The limitation is important. Live makes it easy to audition, duplicate and combine material, so a productive session can quietly become a large collection of possibilities. For this exercise, every choice must help us reach a finished demo.
If choosing the priority track or next action is already the main problem, begin with the free J26 Finish Your Next Track Checklist. It provides a quick reset before the Live Set starts growing.
Optional tools around the workflow
No additional purchase is required for the ten steps. Begin with the computer, headphones and controller you already own.
If you are choosing or upgrading Live, Live 12 Standard is the sensible reference point for this walkthrough. Live 12 Suite is worth considering only when its wider collection of instruments, sounds and Max for Live tools genuinely supports the way you work. Ableton Push 3 offers an optional hands-on route into clips, scenes and performance, while the current Ableton software range at Thomann makes it easier to compare the available choices.
Where a sound library would genuinely help, the J26 Shop recommendation for Splice offers an optional route into royalty-free samples and production tools.
Live 12 can also integrate Splice browsing into Live's Browser on supported current versions. That convenience does not change the rule for this article. Choose a small, deliberate palette before endless auditioning replaces music-making.
The Splice link is an affiliate link. J26 Productions Ltd may receive a commission from a qualifying subscription at no additional cost to the reader. The article remains useful without purchasing anything.
1. Give the Live Set one job
Before loading sounds, decide what the session must prove.
For this demonstration, the job is:
Build a short electronic idea in Session View, create three meaningful variations, perform them into Arrangement View and export a demo that can be judged away from the screen.
Open a new Live Set, choose the tempo and save it immediately inside a clearly named Project folder. I prefer a filename that shows the idea, tempo and revision rather than asking Future Me to understand the creative significance of Untitled 14.
For example:
J26_Live_Demo_124BPM_v01
Set an eight-bar working area and create only the tracks needed for the brief. A practical starting layout might be drums, bass, chords, hook, atmosphere and reference. Name and colour them now so Session View remains readable when the clips begin multiplying.
The first decision should be musical, but a few seconds of organisation protects that decision later. Live Sets belong inside Live Projects, which collect the related files and material. Saving correctly at the start is less glamorous than finding the perfect kick, but considerably more useful when the project returns next week.
What step one must prove: the Set has a purpose, tempo, location and visible working structure.
2. Choose a palette before building the loop
Live's Browser can open the door to an enormous amount of material. The aim is to walk through one useful door rather than repeatedly touring the building.
Choose a deliberately small palette:
- one drum kit or small collection of drum samples,
- one bass instrument,
- one harmonic instrument or sample,
- one lead or hook sound,
- one texture or atmosphere,
- one delay and one reverb on return tracks.
Use the Browser's search, filters, tags and Collections to keep likely sounds visible. If a sound works well enough to test the musical idea, keep moving. It can be replaced later if the arrangement proves that the track deserves more detailed sound design.
This is especially important when using sample platforms. Auditioning in time and key can speed up a session, but convenience can also make every new option feel one click away from perfection.
It rarely is. The next sample is normally just another sample.
Place the chosen instruments and effects on their tracks, then save the Set as the next revision. Avoid building large device chains before any musical relationship exists.
What step two must prove: the project has enough colour to begin without turning sound selection into the entire session.
3. Build the first idea in Session View
Session View is Live's non-linear space for recording, launching and combining clips. That makes it ideal for testing whether a few parts belong together before deciding exactly where they appear in the song.
Begin with one scene and build an eight-bar musical relationship:
- Create or record the main drum clip.
- Add a bass clip that answers the rhythm of the kick.
- Add a chord, sample or atmosphere that establishes the mood.
- Add one hook that remains recognisable when the other parts change.
Launch the clips together and listen for the relationship between them. Do not immediately add six more tracks. Ask whether the groove works, whether the low end is understandable and whether the hook gives the idea a reason to return.
Audio clips can be warped and timed inside Live, while MIDI clips can carry notes into instruments and devices. Those tools create enormous flexibility, but this first scene is still about composition rather than technical demonstration.
If the loop needs constant editing to remain interesting for eight bars, the central idea may not yet be strong enough. Change the notes, rhythm or sound choice before disguising the problem with movement.
What step three must prove: one scene contains a musical idea worth developing.
4. Turn one loop into three useful scenes
The fastest way out of a loop is not to make it longer. It is to create contrast.
Duplicate the first scene twice so the Set now contains three versions of the same musical identity. Give each scene a job:
- Scene A — Introduction: reduced drums, atmosphere and a restrained hint of the hook.
- Scene B — Main groove: full rhythmic foundation, bass, harmony and the recognisable hook.
- Scene C — Lift or break: a changed drum pattern, harmonic movement, filtered texture or a different hook treatment.
Do not make every clip different. Contrast only works when the listener can still recognise what changed. Keep the strongest material consistent and alter one or two elements in each scene.
Scene names can include a useful description, and they can also carry tempo or time-signature information when a performance requires it. For this short demonstration, clear labels such as INTRO, MAIN and LIFT are enough.
Trigger the scenes in different orders and notice which transition creates anticipation. Session View is valuable here because the structure can be explored in real time rather than guessed entirely on a timeline.
I often discover that the scene I confidently labelled MAIN works better as the second half of a break. Live is quite happy to reveal that my first plan was nonsense without making a big ceremony of it.
What step four must prove: the loop has at least three states that can create a journey.
5. Make the kick and bass behave as one system
Before performing the scenes into an Arrangement, make the low end understandable.
Solo the kick and bass long enough to hear their timing and note relationship clearly. The bass can leave space on the kick, answer it between beats or sustain across the bar, but the two parts should feel intentional before processing begins.
Use a spectrum display if it helps identify obvious overlap, but make the first decisions by listening. Change the bass rhythm, octave, note length or sound before assuming that equalisation must solve everything.
When the musical relationship works, sidechain compression can create additional space and movement. Live's Compressor can receive the kick as a sidechain source, allowing each kick to reduce the bass briefly. Set the release so the bass returns in time with the groove rather than breathing randomly around it.
The result can be subtle or strongly rhythmic. For this demonstration, I want enough movement to hear the relationship without making the bass disappear every time the kick arrives.
Sidechain compression is a useful production tool. It is not a legal order requiring every bass sound to throw itself on the floor whenever a kick enters the room.
Check the relationship at a sensible monitoring level and leave comfortable headroom on the Main track.
What step five must prove: the low end feels like one groove rather than two sounds competing for the same space.
6. Perform the scenes into Arrangement View
This is the point where Live's two main views become one workflow.
Ableton's official manual confirms that a Session performance can be recorded directly into Arrangement View. Live captures the clips and scenes that are launched, along with supported mixer, device, tempo and time-signature changes.
Turn on Arrangement Record, launch Scene A and let it establish the track. Move into Scene B when the introduction has created enough anticipation, then trigger Scene C to provide contrast. Return to the main groove for the payoff and stop when the demonstration has made its point.
The first performance does not need to be perfect. Its purpose is to replace the abstract question of arrangement with a real timeline that can be edited.
After recording, switch to Arrangement View and listen from beginning to end. If Session clips take over playback and the timeline does not sound as expected, use Live's Back to Arrangement control to return playback to the recorded Arrangement.
That button has rescued many moments of confusion. The music has not vanished. Live is simply playing a different version of the truth.
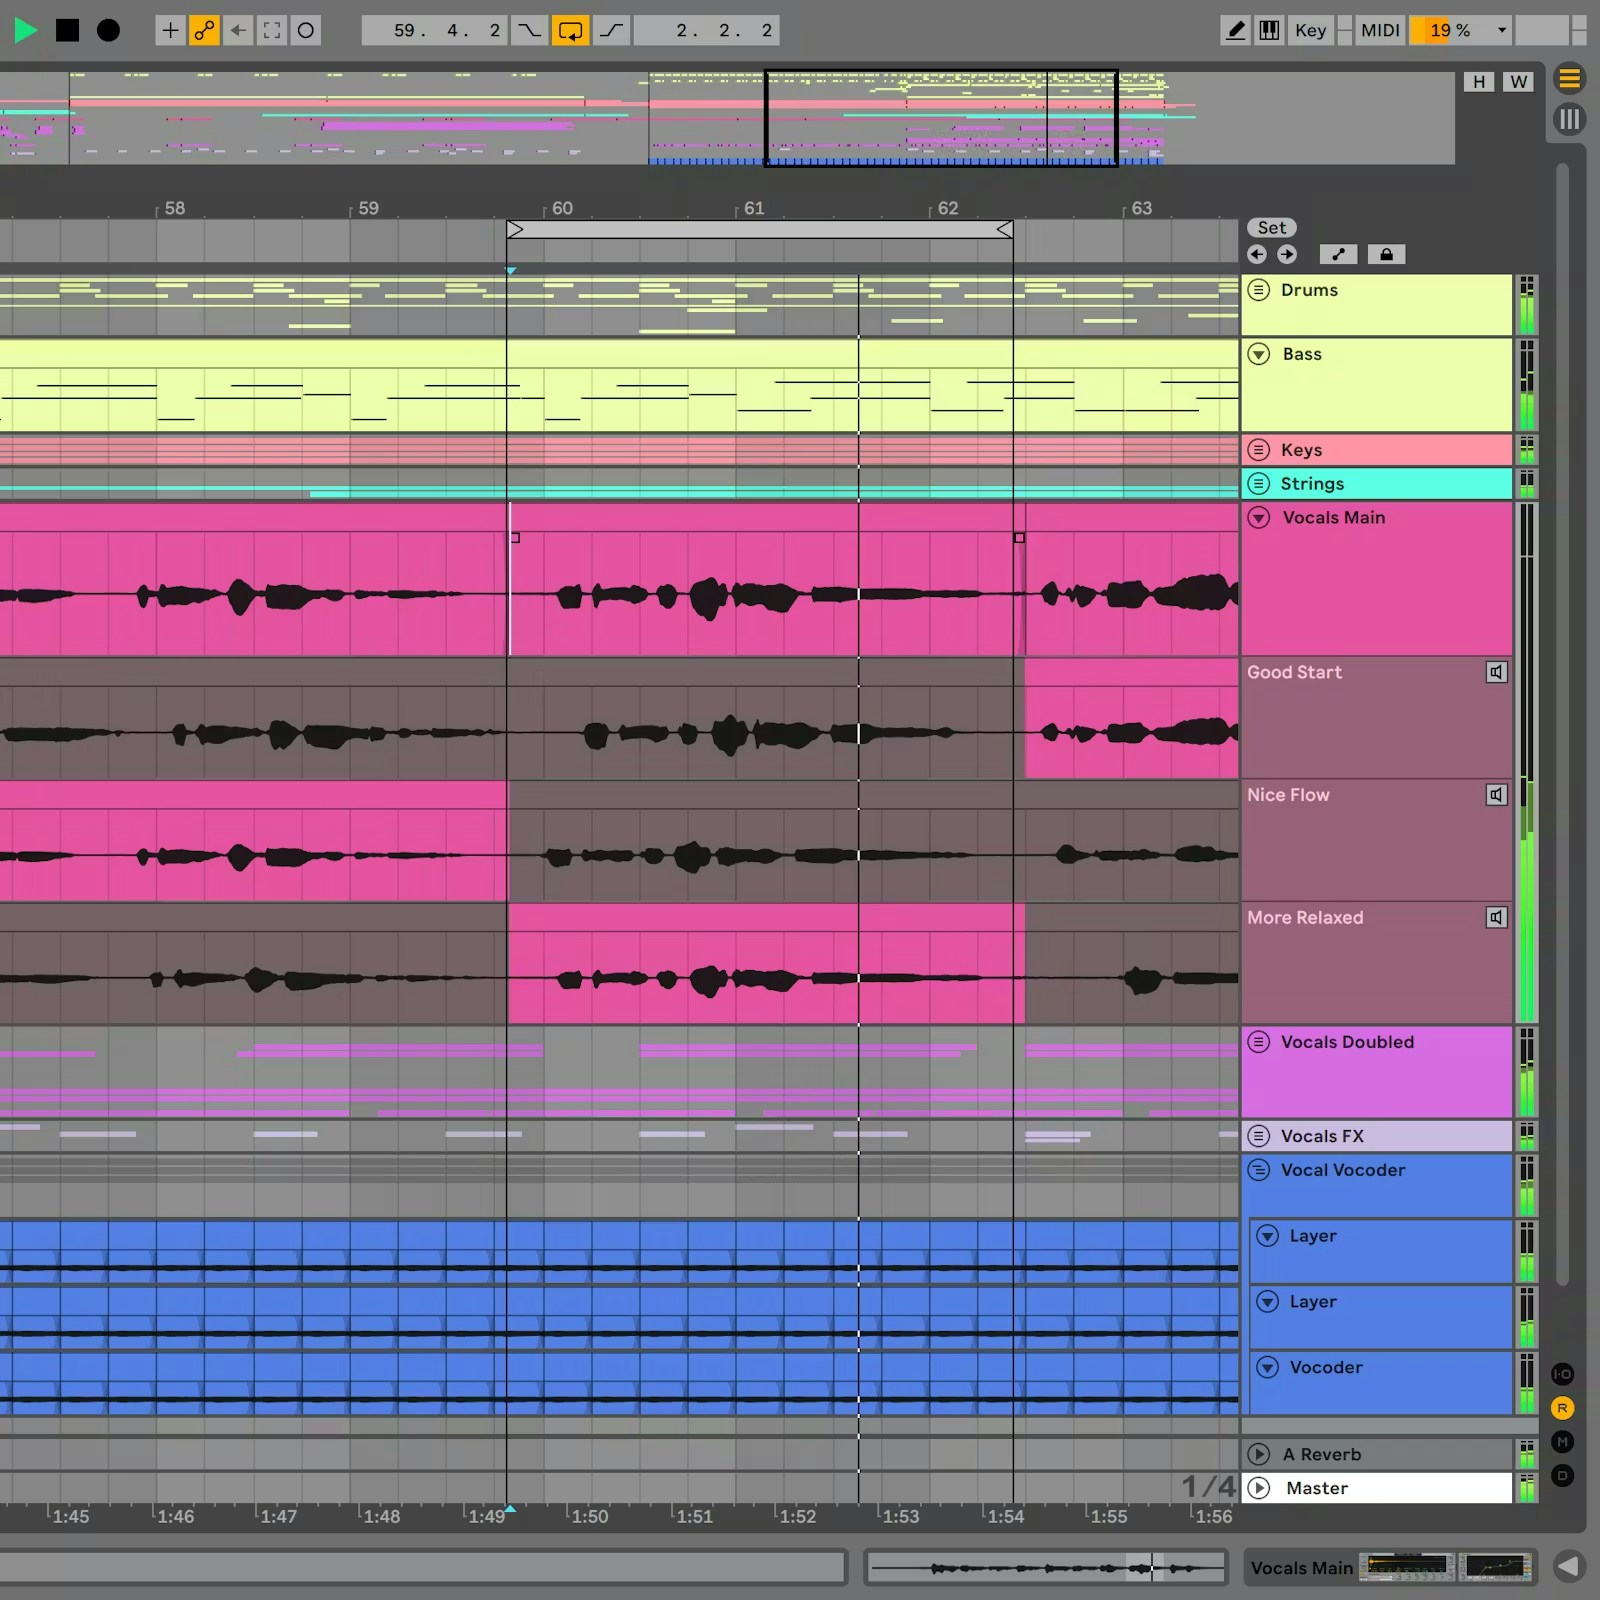
What step six must prove: the strongest clips now exist as a complete first performance on the timeline.
7. Edit the performance into a clear arrangement
The recorded performance provides energy. Arrangement View provides precision.
The Arrangement is Live's linear timeline for structuring a complete song or project. Use it to tighten the performance without removing every human decision that made the transition interesting.
Check the major sections first:
- Does the introduction establish the mood quickly enough?
- Does the main groove arrive with a meaningful increase in energy?
- Does the break or lift create genuine contrast?
- Does the return feel earned?
- Does the demo end deliberately?
Move, duplicate or shorten clips to improve those relationships. Remove unnecessary repetition before adding new material. A 60 to 90-second demonstration does not need every possible club section. It needs enough structure to make the central idea understandable.
Add small fills, silences or transition sounds only where the listener needs help crossing from one section to another. A useful transition explains the structure. A decorative transition merely announces that I found another riser.
This is a natural point to use the J26 Finish Your Track Workbook if arrangement decisions are the recurring bottleneck.
What step seven must prove: the timeline has a beginning, development, contrast, payoff and ending.
8. Create movement with automation and return tracks
Once the structure works without effects, use movement to reinforce it.
Live can record and edit automation for mixer and device controls in Arrangement View. Session clips can also contain automation and modulation, which creates useful movement before or during the performance into the Arrangement.
For this demonstration, keep the automation purposeful:
- open a filter as the main groove approaches,
- reduce reverb when the low end must become more direct,
- increase delay on the final word, hit or hook note,
- automate a send into the break,
- create a short level lift or reduction that supports the section change.
Return tracks are useful for shared delay and reverb because several tracks can feed the same effect. This helps the Set feel connected and avoids loading a separate copy of the same processor everywhere.
Draw or record the few movements that explain the arrangement, then listen with the screen minimised or your attention turned away. If the automation only feels impressive while the red line is moving under the mouse, it may not yet be helping the music.
What step eight must prove: movement supports the arrangement without replacing it.
9. Build a readable demo mix
Live's mixer is available in both Session View and Arrangement View in current Live 12 versions. Once the track has become a timeline, I prefer to make the final demo-balance decisions while looking at the whole Arrangement.
Begin with level and pan. Pull the channels down, rebuild the balance from the core relationship and leave space on the Main output. Group related tracks where overall control is helpful, but keep the most important elements easy to reach.
Then ask three questions.
Is the low end controlled?
The kick and bass should remain clear at quiet monitoring levels. Remove unnecessary low frequencies from parts that do not need them and check that sidechain movement still follows the groove.
Is the middle understandable?
Chords, samples, leads and vocals often compete in the area that gives the track its identity. Choose the focal point for each section and reduce whatever prevents it from being understood.
Does the space support the arrangement?
Reverb and delay should help create depth, transition and emotion. They should not make every sound appear to be performing from the opposite end of an aircraft hangar.
Use compression, equalisation, saturation and limiting only where the demo needs them. Avoid turning the Main chain into an improvised mastering session. The goal is a balanced file that can be judged honestly, not a loud file that wins a five-second comparison and becomes exhausting before the chorus.
What step nine must prove: the song, groove and arrangement remain clear at a sensible level.
10. Export, leave the screen and listen again
Select the full Arrangement, including any delay or reverb tail that should remain after the final musical event. Use Live's Export Audio/Video command and render the Main output for the first listening version.
Choose an appropriate lossless format for the working archive and create a clearly named file such as:
J26_Live_Demo_124BPM_v03_2026-09-03.wav
Do not call it final unless you want the project to punish that confidence by requiring another fourteen exports.
Listen somewhere away from the Live Set. Use headphones, a phone, a small speaker or another familiar system. The change of context removes the visual reassurance of waveforms, meters and perfectly organised tracks.
Write only three observations:
- What already works?
- What is the single biggest obstacle?
- What is the first action for the next session?
The J26 Producer Progress Pack provides an editable route for tracking versions, feedback and next actions when projects begin accumulating unfinished revisions.
Return to the Set only after the notes are clear. The exported demo should decide the next move, not the excitement of seeing every device and automation lane open at once.
What step ten must prove: the idea works as a piece of music outside Ableton Live and has one clear next action.
The complete ten-step map
| Step | Decision | Proof of progress |
|---|---|---|
| 1 | Give the Set one job | A saved Project, tempo and visible track structure |
| 2 | Choose a small palette | Enough sound to begin without endless browsing |
| 3 | Build the first Session idea | One scene with a convincing groove and identity |
| 4 | Create three useful scenes | Introduction, main groove and contrasting lift |
| 5 | Control the low end | A clear kick and bass relationship |
| 6 | Perform into Arrangement | A complete first timeline |
| 7 | Edit the performance | Beginning, development, payoff and ending |
| 8 | Add purposeful movement | Automation and effects that explain the structure |
| 9 | Balance the demo | A readable mix with comfortable headroom |
| 10 | Export and review | A playable file and three useful observations |
What I deliberately leave for later
This demonstration does not need final mastering, detailed vocal editing, complete sound replacement, a full extended club arrangement, complex Max for Live systems or every new feature in Live 12.
Those things can become useful after the idea proves itself.
The distinction matters because Live makes experimentation feel productive, and often it genuinely is. The difficulty is knowing when another possibility improves the track and when it simply postpones the decision to finish it.
The first demo is a checkpoint. It tells us whether the clips became a song, whether the arrangement carries the original energy and whether the idea deserves deeper production.
The J26 takeaway
Ableton Live's strength is not merely that it offers two views. It is that the two views support different stages of the same creative process.
Session View allows musical relationships to remain flexible. Scenes turn one loop into several possible states. Recording those states into Arrangement View preserves the instinct of performance while creating a timeline that can be edited, balanced and exported.
The workflow is therefore not a contest between Session and Arrangement. The sketchpad and the timeline need each other.
Start with one job. Limit the palette. Build one strong scene. Create contrast. Perform the ideas into a real structure. Edit what the performance revealed, add movement with purpose and export before familiarity makes every decision feel correct.
The finished demo does not need to answer every production question. It only needs to make you want to hear the next version.
What comes next
This Ableton walkthrough becomes the second practical article in J26's DAW workflow series after Cubase. The next planned guides can follow the same principle while respecting the character of each platform:
- FL Studio — from Channel Rack pattern to complete Playlist arrangement
- Logic Pro — from Live Loops or first idea to structured Arrangement
- Pro Tools — from recording session to edited and balanced demo
- Bitwig Studio — from Launcher clips and modulation to finished timeline
Together with the wider DAW comparison, these articles will create a connected production library rather than five isolated software reviews.
Frequently asked questions
Do I need Ableton Live Suite for this workflow?
No. The central route through clips, scenes, Session View, Arrangement View, mixing and export can be adapted across current Live editions. The included instruments, effects, tracks and advanced features vary, so check Ableton's current edition comparison before relying on a particular device. If you are ready to buy or upgrade, you can also compare the current Ableton software range at Thomann.
Must every track begin in Session View?
No. Arrangement View can be used from the beginning for a traditional linear workflow. This demonstration starts in Session View because it provides a particularly useful route for testing loops, scenes and transitions before committing to the timeline.
What does Back to Arrangement do?
Launching a Session clip can temporarily take control of that track away from its Arrangement clips. Back to Arrangement returns playback to the material on the recorded timeline.
How many scenes should I create?
Create only enough variation to test structure. Three scenes are sufficient for this short demonstration. A complete live performance or larger production may require more, but additional scenes should have clear jobs rather than being duplicates with slightly different names.
What is the difference between a demo mix and a final mix?
A demo mix makes the composition, groove and structure clear enough to assess and share selectively. A final mix normally follows completed production and involves more detailed editing, balance, automation, translation checks, delivery preparation and revision.
Why export before the track is finished?
Listening away from the DAW changes the context. It makes weak transitions, repeated sections, balance problems and unnecessary details easier to notice. The export also creates a documented version that can receive focused feedback.
Continue the workflow with J26
- Start free with the Finish Your Next Track Checklist
- Use the Finish Your Track Workbook for arrangement and mix decisions
- Connect track completion and release planning with the Complete Creator Toolkit Bundle
- Track versions and feedback with the Producer Progress Pack
- Explore Ableton Live 12 Standard at Thomann
- Compare the current Ableton software range at Thomann
- Explore Ableton Push 3 for a hands-on clip and scene workflow
- Explore the complete J26 Shop
J26 editorial note: The Thomann links use J26 Productions Ltd's approved Clickfire / Thomann Premium Affiliates account, and the Splice link is also an affiliate link. J26 Productions Ltd may receive a commission from a qualifying purchase or subscription at no additional cost to the reader. The J26 workbooks, checklist and bundles are original creator products. This article is designed to be useful without purchasing anything.
Official Ableton references
- What is Ableton Live?
- Ableton Live 12 release notes
- Live concepts and the relationship between Session and Arrangement
- Session View and recording Sessions into the Arrangement
- Arrangement View
- Recording new clips
- Mixing in Live
- Automation and editing envelopes
- Managing Sets and exporting audio
- Ableton press resources